Tuesday, August 9, 2022

CENTOS 8 repo

dualAV


https://drive.google.com/file/d/1VGudlTY1UwG1cPTq1yYwYbOn6lnyBB4I/view?usp=sharing


 http://ftp.uma.es/mirror/epel/8/Everything/x86_64/Packages/c/


https://linux.cc.iitk.ac.in/mirror/centos/epel/8/testing/Everything/Packages/c/


SPEEDUP


 rpm -ivh --nodigest --nofiledigest <rpm>

https://drive.google.com/file/d/1fYBw27pU1X2sCILvyKzlZgy5wW-Lg6sS/view?usp=sharing
https://drive.google.com/drive/folders/1wxb03TZSStNPrpPdkx3CSD04xFN984dP?usp=sharing
 rpm -Kvv <rpm>

Sunday, October 20, 2019

vsftp max_per_ip=0

postConfSetup
line 273
line254

iptables for ftps
disable logratelimit
source switch put two powersupply
reconfigure NAS with the new ip addresses for both setup
edit FG return message
FG inspection mode from flow to proxy

killthemall add if onlypidexist copy from gatherandcollectpid

rateLimit:
/etc/rsyslog.conf

$SystemLogRateLimitInterval 0
$SystemLogRateLimitBurst    0

 Add the following parameter after “$ModLoad imjournal” under section “#### MODULES ####
$ImjournalRateLimitInterval 0


/etc/systemd/journald.conf 
RateLimitInterval=0
RateLimitBurst=0

# systemctl restart systemd-journald
# systemctl restart rsyslog

    if [[ `grep 'Mounted on Master' $tempfile`  ]];then
        echo "curStat=0;avFtpStat=Not running.Reason: SLAVE" >> $tempfile
    else

Monday, June 4, 2018

ftpsCommandsForProFtp

ROOT CA
================
Create Root Key
    openssl genrsa -des3 -out rootCA.key 4096

Create and self sign the Root Certificate
    openssl req -x509 -new -nodes -key rootCA.key -sha256 -days 1024 -out rootCA.crt

Create a certificate (Done for each server)
    This procedure needs to be followed for each server/appliance that needs a trusted certificate from our CA
    Create the certificate key
        openssl genrsa -out mydomain.com.key 2048

    Create the signing request
        openssl req -new -key mydomain.com.key -out mydomain.com.csr

upload the request to the root CA and sign it using following method.
create signed cert from root CA
        openssl x509 -req -in mydomain.com.csr -CA rootCA.crt -CAkey rootCA.key -CAcreateserial -out mydomain.com.crt -days 500 -sha256


on Each Server and client
=========================
Add the CA to the trusted CA
    update-ca-trust force-enable
    cp rootCA.crt /etc/pki/ca-trust/source/anchors/
    update-ca-trust extract


Check the time is correct on rootCA Server , client and the server (if not , ssl won't work properly)

curl FTPS command:
    curl -v --connect-timeout 5 -T "testfile1" --cert ./192.168.20.2.crt --key 192.168.20.2.key --cacert /etc/ssl/certs/ca-bundle.crt --ftp-ssl -u "data:data@" ftps://192.168.20.1/test2/"testfile1"


lftp
====
lftp -e "debug 13; set ftp:ssl-force true; set ftp:ssl-protect-data true; set ftp:ssl-protect-list true; set ftp:ssl-auth SSL; set ssl:verify-certificate no;" -p 990 -u MQ ftps://ftpsserver.gsn.ae:/123/


curl -vvv --connect-timeout 5 -T "testfile1" --cacert /etc/ssl/certs/ca-bundle.crt --ftp-ssl -u "data:data" ftps://upstream.ssd.ae:/"testfile1"


  TLSEngine                     on
  TLSRequired                   on
  TLSCACertificateFile          /root/keysforupstream/rootCA.crt
  TLSRSACertificateFile         /root/keysforupstream/upstream.crt
  TLSRSACertificateKeyFile      /root/keysforupstream/upstream.key
  TLSCipherSuite                ALL:!ADH:!DES
  TLSOptions                    NoCertRequest UseImplicitSSL NoSessionReuseRequired
  Port                          990
  TLSVerifyClient               off
  #TLSRenegotiate               ctrl 3600 data 512000 required off timeout 300
  TLSLog                        /var/log/proftpd/tls.log
#  <IfModule mod_tls_shmcache.c>
#    TLSSessionCache            shm:/file=/var/run/proftpd/sesscache
  </IfModule>
#</IfDefine>


ftps
===========
anonymous_enable=NO
local_enable=YES
write_enable=YES
local_umask=022
dirmessage_enable=YES
xferlog_enable=YES
xferlog_std_format=NO
log_ftp_protocol=YES
vsftpd_log_file=/var/log/vsftpd.log
listen=YES
#listen_address=3.3.3.1
pam_service_name=vsftpd
#userlist_enable=YES
userlist_deny=NO
tcp_wrappers=YES
chroot_local_user=YES
local_root=/home/$USER
user_sub_token=$USER
implicit_ssl=YES
listen_port=990
ssl_enable=YES
force_local_data_ssl=YES
force_local_logins_ssl=YES
ssl_tlsv1=YES
ssl_sslv2=NO
ssl_sslv3=NO
require_ssl_reuse=NO
#require_cert=YES
#validate_cert=YES
ca_certs_file=/etc/ssl/certs/ca-bundle.crt
rsa_cert_file=/etc/vsftpd/Cert/192.168.60.21.crt
rsa_private_key_file=/etc/vsftpd/Cert/192.168.60.21.key
cmds_allowed=ABOR,ACCT,ALLO,APPE,CCC,CDUP,CWD,EPSV,LIST,MDTM,MLST,MODE,NLST,NOOP,OPTS,PASS,PASV,PBSZ,PORT,PWD,QUIT,REIN,REST,RETR,RNFR,RNTO,SITE,SIZE,STAT,STOR,STRU,SYST,TYPE,USER,FEAT,PROT
pasv_enable=YES
pasv_max_port=65535
pasv_min_port=64000
#allow_writeable_chroot=YES


Second one
---------------------
anonymous_enable=NO
local_enable=YES
write_enable=YES
local_umask=022
dirmessage_enable=YES
xferlog_enable=YES
xferlog_std_format=NO
log_ftp_protocol=YES
vsftpd_log_file=/var/log/vsftpd.log
listen=YES
pam_service_name=vsftpd
chroot_local_user=YES
local_root=/home/$USER
user_sub_token=$USER
implicit_ssl=YES
listen_port=990
ssl_enable=YES
force_local_data_ssl=YES
force_local_logins_ssl=YES
ssl_tlsv1=YES
ssl_sslv2=NO
ssl_sslv3=NO
require_ssl_reuse=NO
ca_certs_file=/etc/ssl/certs/ca-bundle.crt
rsa_cert_file=/root/FTPS/192.168.60.21.crt
rsa_private_key_file=/root/FTPS/192.168.60.21.key
pasv_enable=YES
pasv_max_port=65535
pasv_min_port=64000


eicar
X5O!P%@AP[4\PZX54(P^)7CC)7}$EICAR-STANDARD-ANTIVIRUS-TEST-FILE!$H+H*


FTPS ERROR CONF
-------------------------
anonymous_enable=NO
local_enable=YES
write_enable=YES
local_umask=022
dirmessage_enable=YES
xferlog_enable=YES
xferlog_std_format=NO
log_ftp_protocol=YES
vsftpd_log_file=/var/log/vsftpd.log
listen=YES
#listen_address=3.3.3.1
pam_service_name=vsftpd
#userlist_enable=YES
userlist_deny=NO
tcp_wrappers=YES
chroot_local_user=YES
local_root=/home/$USER
user_sub_token=$USER
implicit_ssl=YES
listen_port=990
ssl_enable=YES
force_local_data_ssl=YES
force_local_logins_ssl=YES
ssl_tlsv1=YES
ssl_sslv2=NO
ssl_sslv3=NO
require_ssl_reuse=NO
#require_cert=YES
#validate_cert=YES
ca_certs_file=/etc/ssl/certs/ca-bundle.crt
rsa_cert_file=/etc/vsftpd/Cert/192.168.20.1.crt
rsa_private_key_file=/etc/vsftpd/Cert/192.168.20.1.key
cmds_allowed=ABOR,ACCT,ALLO,APPE,CCC,CDUP,CWD,EPSV,LIST,MDTM,MLST,MODE,NLST,NOOP,OPTS,PASS,PASV,PBSZ,PORT,PWD,QUIT,REIN,REST,RETR,RNFR,RNTO,SITE,SIZE,STAT,STOR,STRU,SYST,TYPE,USER,FEAT,PROT
pasv_enable=YES
pasv_max_port=65535
pasv_min_port=64000
#allow_writeable_chroot=YES


error:
====================
< 220 (vsFTPd 3.0.2)
> USER data
< 331 Please specify the password.
> PASS data
* FTP response reading failed
* Closing connection #0

curl: (56) NSS: client certificate not found (nickname not specified)


ftps fix
=-=======================
anonymous_enable=NO
local_enable=YES
write_enable=YES
local_umask=022
dirmessage_enable=YES
xferlog_enable=YES
xferlog_std_format=NO
log_ftp_protocol=YES
vsftpd_log_file=/var/log/vsftpd.log
listen=YES
#listen_address=3.3.3.1
pam_service_name=vsftpd
#userlist_enable=YES
userlist_deny=YES
tcp_wrappers=YES
chroot_local_user=YES
local_root=/home/$USER
user_sub_token=$USER
implicit_ssl=YES
listen_port=990
ssl_enable=YES
force_local_data_ssl=YES
force_local_logins_ssl=YES
ssl_tlsv1=YES
ssl_sslv2=NO
ssl_sslv3=NO
require_ssl_reuse=NO
#require_cert=YES
#validate_cert=YES
ca_certs_file=/etc/ssl/certs/ca-bundle.crt
rsa_cert_file=/etc/vsftpd/Cert/192.168.20.1.crt
rsa_private_key_file=/etc/vsftpd/Cert/192.168.20.1.key
cmds_allowed=ABOR,ACCT,ALLO,APPE,CCC,CDUP,CWD,EPSV,LIST,MDTM,MLST,MODE,NLST,NOOP,OPTS,PASS,PASV,PBSZ,PORT,PWD,QUIT,REIN,REST,RETR,RNFR,RNTO,SITE,SIZE,STAT,STOR,STRU,SYST,TYPE,USER,FEAT,PROT
pasv_enable=YES
pasv_max_port=65535
pasv_min_port=64000
allow_writeable_chroot=YES


Centos6.6
=================================
anonymous_enable=NO
local_enable=YES
write_enable=YES
local_umask=022
dirmessage_enable=YES
xferlog_enable=YES
xferlog_std_format=NO
log_ftp_protocol=YES
vsftpd_log_file=/var/log/vsftpd.log
listen=YES
#listen_address=3.3.3.1
pam_service_name=vsftpd
#userlist_enable=YES
userlist_deny=YES
tcp_wrappers=YES
#chroot_local_user=YES
#local_root=/home/$USER
#user_sub_token=$USER
implicit_ssl=YES
listen_port=990
ssl_enable=YES
force_local_data_ssl=YES
force_local_logins_ssl=YES
ssl_tlsv1_1=YES
ssl_sslv2=NO
ssl_sslv3=NO
require_ssl_reuse=NO
#require_cert=YES
#validate_cert=YES
ca_certs_file=/etc/ssl/certs/ca-bundle.crt
rsa_cert_file=/etc/vsftpd/Cert/192.168.20.3.crt
rsa_private_key_file=/etc/vsftpd/Cert/192.168.20.3.key
cmds_allowed=ABOR,ACCT,ALLO,APPE,CCC,CDUP,CWD,EPSV,LIST,MDTM,MLST,MODE,NLST,NOOP,OPTS,PASS,PASV,PBSZ,PORT,PWD,QUIT,REIN,REST,RETR,RNFR,RNTO,SITE,SIZE,STAT,STOR,STRU,SYST,TYPE,USER,FEAT,PROT
pasv_enable=YES
pasv_max_port=65535
pasv_min_port=64000
#allow_writeable_chroot=YES

FTPS transfer 10 GIG file

SFTP transfer


curl --connect-timeout 5 -k -u "$username:" --key /root/.ssh/id_rsa --pubkey /root/.ssh/id_rsa.pub "sftp://$targetIP/"$tgtDirname"/$remotefile" -T "$filefullpath" >/dev/null 2>&1
curl --connect-timeout 5 -k "sftp://$targetIP/"$tgtDirname"/$remotefile" --user "$username:$password" -T "$filefullpath" >/dev/null 2>&1


Thursday, July 31, 2014

Configuring Cisco ASA Active/Standby failover using ASDM


Set the IP Address to your interfaces, keep the interface e3 and e4 enabled, that two interfaces we will use as our failover control link and failover state link.


Connect to your ASA1 using ASDM.


Choose the High Availability and Scalability Wizard


Choose the option "Configure Active/Standby Failover


Provide the IP Address of your standby ASA's. Please note that you can give the IP address of an interface where you enabled ASDM access. After you provide the IP address, please click on next and then the ASDM will start the compatibility checking with the peer. If any check is not success, then you have to correct that issue and come back.


Here you have to specify a failover LAN link IP address, Also provide the secret key for failover configuration and the same key we have to use in our Secondary Unit.


Here you have to specify a state link between the active and secondary device, you can also use the same failover link as your state link, but it is always better to have a state link separately.


Here you can provide your Standby Addresses; the addresses of your standby unit.


Once you have done the configurations, click on finish.


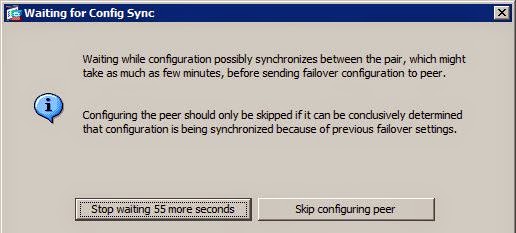
Please do not skip the configuration if you are configuring Failover for the first time, if you are configuring it for the second or more, if the standby configurations are already made, then you can skip configuring the peer, otherwise please wait and the Active ASA unit will send the configuration commands to the Standby unit.


These are the configurations that Active ASA is going to send to the Standby ASA. Click on Send.


Once it send the configuration, you can see the configuration completed screen.


Once you finish the configurations, you can check it on your monitoring--properties--Failover--Status

After the failover configuration, whatever changes you make in the Active Appliance, it will be replicated to the Standby Unit.


Here you can see that the configuration that we made in the Active is synchronized to the Standby Unit.

Thank You. 

Monday, May 27, 2013

Configuring Site-to-Site VPN in ASA firewall

VPN is used to create a secure connection over an insecure network (Internet).The internet is an insecure medium, so the data pass through the internet cannot be reliable. We cannot be sure about the security of the data. To provide security of the data through internet, we can use VPN.
There is a wide variety of VPNs available nowadays. The VPN supportedby the appliance include
 IPSec VPN
SSL VPN(web VPN)
PPTP (Point to Point Tunneling Protocol)
L2TP (Layer 2 Tunneling Protocol)


What is a Site-to-Site VPN?
site-to-site VPN allows offices in multiple fixed locations to establish secure connections with each other over a public network such as the Internet. Site-to-site VPN extends the company's network, making computer resources from one location available to employees at other locations. An example of a company that needs a site-to-site VPN is a growing corporation with dozens of branch offices around the world.

For the Site-to Site VPN we have to configure in both ends (firewalls).

The configuration of VPN is a two step process.

  1. IPSec Phase 1 configuration
  2. IPSec Phase 2 configuration 

Configuration of IPSec Site-to-Site VPN

You can configure the same Site-to-Site VPN using the ASDM. But I prefer to use the CLI.


I hope you already know something about the ISAKMP process and the steps it would take for initiating a connection. So we are not going to discuss that in this scenario.
First we have to set IP and Routing in all these Devices. We will use OSPF protocol for routing.

R2 Router

R2#conf t
R2(config)#interface e1/0
R2(config-if)#ip add 10.0.0.2 255.0.0.0
R2(config-if)#no shut
R2(config-if)#exit
R2(config)#router ospf 1
R2(config-router)#network 10.0.0.0 255.0.0.0 area 0

R3 Router


R3#conf t
R3(config)#interface e1/0
R3(config-if)#ip add 30.0.0.2 255.0.0.0
R3(config-if)#no shut
R3(config-if)#exit
R3(config)#router ospf  1
R3(config-router)#network 30.0.0.0 255.0.0.0 area 1

ASA1

Asa#config t
Asa(config)#int e0/0
Asa(config-if)#ip add 10.0.0.1 255.0.0.0
Asa(config-if)#nameif inside
Asa(config-if)#no shut
Asa(config-if)#exit

Asa(config)#int e0/1
Asa(config-if)#ip add 20.0.0.1 255.0.0.0
Asa(config-if)#nameif outside
Asa(config-if)#no shut
Asa(config-if)#exit

Asa(config)#router ospf 1
Asa(config-router)#network 10.0.0.0 255.0.0.0 area 0
Asa(config-router)#network 20.0.0.0 255.0.0.0 area 1
Asa(config-router)#exit

we will add an access list that will permit the ICMP protocol. It would be helpful if we allow the ping request to pass through your appliance.

Asa (config)#access-list  INBOUND_ACL extended permit icmp any any echo
Asa (config)#access-list  INBOUND_ACL extended permit icmp any any echo-reply
Asa (config)#access-list  INBOUND_ACL extended permit icmp any any source-quench
Asa (config)#access-list  INBOUND_ACL extended permit icmp any any time-exceeded
Asa (config)#access-list  INBOUND_ACL extended permit icmp any any unreachable
Asa (config)#access-list  INBOUND_ACL extended permit icmp any any
Asa (config)#access-group  INBOUND_ACL in interface outside

Now we will create an ISAKMP policy 

Asa(config)#crypto isakmp policy 1
Asa(config-isakmp-policy)#authentication pre-share
Asa(config-isakmp-policy)#encryption aes-256
Asa(config-isakmp-policy)#hash sha
Asa(config-isakmp-policy)#group 2
Asa(config-isakmp-policy)#lifetime 86400
Asa(config-isakmp-policy)#exit
Asa(config)#tunnel-group  20.0.0.2  type   ipsec-l2l
Asa(config)#tunnel-group   20.0.0.2  ipsec-attributes
Asa(config-tunnel-ipsec)#pre-shared-key    cisco
Asa(config)#access-list encrypt_acl extended permit ip 30.0.0.0 255.0.0.0   10.0.0.0 255.0.0.0
Asa(config)#nat    (inside)   0   access-list encrypt-acl
Asa(config)#crypto    ipsec   transform-set    myset    esp-aes-256  esp-sha-hmac
Asa(config)#crypto   map   IPSECMAP   10  match   address   encrypt_acl
Asa(config)#crypto   map   IPSECMAP   10  set peer    20.0.0.2
Asa(config)#crypto   map   IPSECMAP   10 set  transform-set  myset
Asa(config)#crypto   map   IPSECMAP   interface outside
Asa(config)#crypto   isakmp  enable  outside

We have to do the same configurations in the second ASA also, make sure you are typing the same pre-shared key and encryption algorithm and also pay attention to the lifetime.
ASA2

Asa#config t
Asa(config)#int e0/1
Asa(config-if)#ip add 30.0.0.1 255.0.0.0
Asa(config-if)#nameif inside
Asa(config-if)#no shut
Asa(config-if)#exit

Asa(config)#int e0/0
Asa(config-if)#ip add 20.0.0.2 255.0.0.0
Asa(config-if)#nameif outside
Asa(config-if)#no shut
Asa(config-if)#exit

Asa(config)#router ospf 1
Asa(config-router)#network 30.0.0.0 255.0.0.0 area 1
Asa(config-router)#network 20.0.0.0 255.0.0.0 area 1
Asa(config-router)#exit

Asa (config)#access-list  INBOUND_ACL extended permit icmp any any echo
Asa (config)#access-list  INBOUND_ACL extended permit icmp any any echo-reply
Asa (config)#access-list  INBOUND_ACL extended permit icmp any any source-quench
Asa (config)#access-list  INBOUND_ACL extended permit icmp any any time-exceeded
Asa (config)#access-list  INBOUND_ACL extended permit icmp any any unreachable
Asa (config)#access-list  INBOUND_ACL extended permit icmp any any
Asa (config)#access-group  INBOUND_ACL extended in interface outside

Asa(config)#crypto isakmp policy 1
Asa(config-isakmp-policy)#authentication pre-share
Asa(config-isakmp-policy)#encryption aes-256
Asa(config-isakmp-policy)#hash sha
Asa(config-isakmp-policy)#group 2
Asa(config-isakmp-policy)#lifetime 86400
Asa(config-isakmp-policy)#exit
Asa(config)#tunnel-group  20.0.0.1  type   ipsec-l2l
Asa(config)#tunnel-group   20.0.0.1  ipsec-attributes
Asa(config-tunnel-ipsec)#pre-shared-key    cisco
Asa(config)#access-list encrypt_acl extended permit ip 10.0.0.0 255.0.0.0   30.0.0.0 255.0.0.0
Asa(config)#nat    (inside)   0   access-list encrypt-acl
Asa(config)#crypto    ipsec   transform-set    myset    esp-aes-256  esp-sha-hmac
Asa(config)#crypto   map   IPSECMAP   10  match   address   encrypt_acl
Asa(config)#crypto   map   IPSECMAP   10  set peer    20.0.0.1
Asa(config)#crypto   map   IPSECMAP   10 set  transform-set  myset
Asa(config)#crypto   map   IPSECMAP   interface outside
Asa(config)#crypto   isakmp  enable  outside

In these commands we set VPN for the IP traffic.

If we need to check the ICMP traffic…then you have to permit ICMP traffic through VPN

For that in each ASA please enter this command

Ciscoasa(config)#access-list   encrypt_acl   extended permit   icmp   any   any


For verifying the VPN use the command

Ciscoasa(config)#debug   crypto   isakmp   127

 After setting all these configuration and if you start a ping from one router to another. It will trigger the VPN tunnel and automatically start the site-to-site VPN.


Wednesday, June 27, 2012

Configuring Active/Standby Failover in cisco ASA


Failover provides redundancy between the appliances, so if one appliance fails, you can have a redundant appliance take over the failed one.  So most of the companies will implement the failover for network security and redundancy. 

Failover is a Cisco-proprietary feature unique to the security appliance. Failover provides redundancy between paired appliances: one appliance backs up another appliance.  This section will introduce failover concepts.


Failover implementations

There are two implementations that cisco supports for failover. 

Active/Standby
Active/Active

Active/ Standby

The active/standby implementation of failover needs two appliances: primary and Secondary. By default primary unit performs the active role, and the secondary the standby role. Only one appliance will process the traffic. If anything happened to the primary appliance, then the secondary appliance will take place the role of active.

The following is the configuration of Active/Standby failover in cisco ASA.


ASA1

Ciscoasa(config)#hostname   asa1
Asa1(config)#int e0/0
Asa1(config-if)#nameif   inside
Asa1(config-if)#ip add   192.168.2.1    255.255.255.0   standby   192.168.2.2
Asa1(config-if)#no shut

Asa1(config)#int e0/1
Asa1(config-if)#nameif   outside
Asa1(config-if)#ip add   192.168.1.1   255.255.255.0   standby   192.168.1.2
Asa1(config-if)#no shut

Asa1(config)#int e0/2
Asa1(config-if)#no shut
Asa1(config)#int e0/3
Asa1(config-if)#no shut
Asa1(config-if)#exit

Asa1(config)#failover   lan   unit   primary
Asa1(config)#failover   lan   interface   FOControl e0/2
Asa1(config)#failover   interface   ip   FOControl   192.168.20.1   255.255.255.0   standby   192.168.20.2
Asa1(config)#failover   link   FOState   e0/3
Asa1(config)#failover   interface   ip   FOState   192.168.21.1   255.255.255.0   standby   192.168.21.2
Asa1(config)#failover   key   cisco
Asa1(config)#failover   polltime   msec   200   holdtime   msec   800
Asa1(config)#


ASA2


ciscoasa(config)#hostname  asa2
Asa2(config)#int e0/0
Asa2(config-if)#no shut
Asa2(config-if)#int e0/1
Asa2(config-if)#no shut
Asa2(config-if)#int e0/2
Asa2(config-if)#no shut
Asa2(config-if)#int e0/3
Asa2(config-if)#no shut

Asa2(config)#failover   lan   unit   secondary
Asa2(config)#failover   key   cisco
Asa2(config)#failover   lan   interface   FOControl   e0/2
Asa2(config)#failover   interface   ip   FOControl   192.168.20.1   255.255.255.0   standby   192.168.20.2


To verify the failover is working or not…

Use the command   failover    in both appliances


Configuring Active Active Failover in Cisco ASA firewall


    Failover provides redundancy between the appliances, so if one appliance fails, you can have a redundant appliance take over the failed one.  So most of the companies will implement the failover for network security and redundancy. 


    Failover is a Cisco-proprietary feature unique to the security appliance. Failover provides redundancy between paired appliances: one appliance backs up another appliance.  This section will introduce failover concepts.


    Failover implementations


    There are two implementations that cisco supports for failover. 


    Active/Standby
    Active/Active


    Here we are going to learn about Active/Active failover in the ASA


    In the active/active implementation of failover, both appliances will process the traffic. To implement active/active failover, two contexts are needed. Failover can occur if a context is fails or if the entire appliance fails.

    Configuration of Active/Active failover is some simple steps. But when you are doing it in GNS3, you must be careful about the switch configurations.

    Here in the picture you can see both switches are connected with ASA. The connected ports must be in the same vlan (example: vlan 1) and must be in trunk (example: dot1q).

    Now the following steps are the configuration of Active/Active Failover


    ASA1


    Ciscoasa(config)#hostname   asa1
    Asa1(config)#int     e0/0
    Asa1(config-if)#no   shut
    Asa1(config-if)#int   e0/1
    Asa1(config-if)#no   shut
    Asa1(config-if)#int  e0/2
    Asa1(config-if)#no   shut
    Asa1(config-if)#int   e0/3
    Asa1(config-if)#no   shut

    Creating virtual interfaces for contexts

    Asa1(config)#int   e0/0.1
    Asa1(config-if)#vlan   3
    Asa1(config-if)#no    shut
    Asa1(config-if)#int   e0/0.2
    Asa1(config-if)#vlan  5
    Asa1(config-if)#no   shut
    Asa1(config-if)#int   e0/1.1
    Asa1(config-if)#vlan    2
    Asa1(config-if)#no   shut
    Asa1(config-if)#int  e0/1.2
    Asa1(config-if)#vlan   4
    Asa1(config-if)#no   shut
    Asa1(config-if)#exit

    Create two failover groups for adding the contexts

    Asa1(config)#failover   group    1
    Asa1(config-fover-group)#exit
    Asa1(config)#failover   group   2
    Asa1(config-fover-group)#exit


    Creating contexts and allocating interfaces to contexts

    Asa1(config)#admin-context   admin
    Asa1(config)#context   admin
    Asa1(config-ctx)#config-url     disk0:/.private/admin.cfg

    Creating context c1

    Asa1(config-ctx)#context   c1
    Asa1(config-ctx)#allocate-interface   e0/0.1
    Asa1(config-ctx)#allocate-interface   e0/1.1
    Asa1(config-ctx)#join-failover-group   1
    Asa1(config-ctx)#config-url   disk0:/.private/c1.cfg

    Creating context c2


    Asa1(config-ctx)#context   c2
    Asa1(config-ctx)#allocate-interface   e0/0.2
    Asa1(config-ctx)#allocate-interface   e0/1.2
    Asa1(config-ctx)#join-failover-group   2
    Asa1(config-ctx)#config-url     disk0:/.private/c2.cfg

    Setting IP for the virtual interfaces in contexts


    Asa1(config-ctx)#changeto   context   c1
    Asa1/c1(config)#int   e0/0.1
    Asa1/c1(config-if)#nameif    inside
    Asa1/c1(config-if)#ip   add    172.16.1.1   255.255.255.0   standby   172.16.1.2
    Asa1/c1(config-if)#no   shut
    Asa1/c1(config-if)#int   e0/1.1
    Asa1/c1(config-if)#nameif   outside
    Asa1/c1(config-if)#ip   add   172.16.2.1   255.255.255.0   standby   172.16.2.2
    Asa1/c1(config-if)#no   shut

    Asa1/c1(config-if)#changeto    context    c2
    Asa1/c2(config)#interface    e0/0.2
    Asa1/c2(config-if)#nameif   inside
    Asa1/c2(config-if)#ip    add   192.168.1.1    255.255.255.0   standby   192.168.1.2
    Asa1/c2(config-if)#no    shut
    Asa1/c2(config-if)#int   e0/1.2
    Asa1/c2(config-if)#nameif     outside
    Asa1/c2(config-if)#ip  add   192.168.2.1   255.255.255.0   standby   192.168.2.2
    Asa1/c2(config-if)#no  shut
    Asa1/c2(config-if)#exit
    Asa1/c2(config)#exit


    Asa1(config)#failover   lan  interface   LANFO    e0/2
    Asa1(config)#failover   link   LANFO
    Asa1(config)#failover  interface ip  LANFO  192.168.20.1     255.255.255.0   standby    192.168.20.2
    Asa1(config)#failover   lan   unit   primary
    Asa1(config)#failover   polltime   msec  500


    ASA2


    Asa2(config)#int  e0/0
    Asa2(config-if)#no shut
    Asa2(config-if)#int e0/1
    Asa2(config-if)#no shut
    Asa2(config-if)#int e0/2
    Asa2(config-if)#no shut
    Asa2(config-if)#int e0/3
    Asa2(config-if)#no shut


    Asa2(config)#failover   lan  unit  secondary
    Asa2(config)#failover  lan   interface  LANFO   e0/2
    Asa2(config)#failover   interface   ip   LANFO   192.168.20.1   255.255.255.0   standby   192.168.20.2

    Create an Admin Context

    Asa2(config)#admin-context    admin
    Asa2(config)#context   admin
    Asa2(config-ctx)#config-url  disk0:/.private/admin.cfg


    After the configuration, to make the failover working, you have to use the command   failover    in both appliances.


    For the correct working of Active/active failover, you have to enter some more commands in the primary ASA

    Asa1(config)# failover  group  1
    Asa2(config-fover-group)#primary
    Asa2(config-fover-group)#preempt
    Asa2(config-fover-group)#exit

    Asa2(config)#failover group 2
    Asa2(config-fover-group)#secondary
    Asa2(config-fover-group)#preempt
    Asa2(config-fover-group)#exit